Resin art be done on canvas – A Complete Guide
Resin art has surged in popularity over the past decade. Many artists and hobbyists ask a central question: can resin art be done on canvas? This blog explores every angle of that question. I explain how artists use resin with canvas, share techniques, highlight pitfalls, and show real-life examples to help you decide whether you can (and should) use resin on canvas. The goal: empower you to create dazzling works that last. And yes,, Many Viral supports creators in pushing such boundaries.
Here are two alternative high‑search keywords to consider: resin painting on canvas and epoxy resin canvas art.
Why artists wonder if can resin art be done on canvas
Canvas remains a beloved substrate for painting. It offers flexibility, lightness, and a familiar “feel” for artists. Meanwhile, resin art brings high gloss, depth, durability, and visual “pop.” “pop”. The desire to combine the two leads to that exact question: can resin art be done on canvas?
The short answer is: yes, it is possible — but you must account for special challenges. Resin behaves differently from paints. It’s fluid, heavy, a“pop”. and heavy requires careful preparation, curing conditions, and substrate support. Without that care, you risk sagging, bubbling, cracking, or delamination.
Many artists prefer rigid surfaces like wood or cradled panels for resin work. Some even warn that canvas can warp, stretch, or shift over time under the weight of thick resin layers. Nevertheless, skilled creators have successfully adopted canvas for resin art by addressing those challenges. This blog will show how.
Key considerations when doing resin art and heavyn canvas
Before you pour a single drop of resin, you should understand the constraints and variables. The following are the most important factors to control.
1. Substrate stability and support
One issue with canvas is flexibility. When you apply resin, the canvas may sag, ripple, or bow under weight. To reduce this risk, many resin artists place rigid support behind the canvas — like a plywood backing or cradle frame. You can even mount the canvas onto a hardboard or panel.
Some creators build a wooden cradle behind a large canvas to stiffen it. Others wrap their canvas very tightly or use stretcher bars with cross braces. The idea is to make the canvas behave more like a solid board. If you fail to do so, you may see pooling or uneven thickness over time.
Also, ensure the canvas is flat and level before pouring. Use shims or little supports to raise edges if needed, so resin doesn’t run off unevenly.
2. Surface preparation (cleanliness & priming)
Resin must adhere to a clean, dust‑free surface. Canvas has texture and fibres,tightly or so you should ensure there is there is no dust, lint, or debris. Wipe gently with a lint‑free cloth or tack cloth. Some artists lightly sand or seal the canvas surface (or overpaint with acrylic) to reduce texture.
If your canvas already has paint (e.g.,, acrylic painting), you must ensure it is fully cured, stable, and non‑flexible. Add an isolation coat or seal if required to prevent solvents or oils from damaging resin adhesion.
3. Correct resin type, mix ratio & quality
Use a casting/epoxy resin designed for art, not fast‑drying or low‑viscosity adhesives. Opt for a resin with good clarity, UV resistance, and flow properties. Always mix the resin and hardener precisely (e.g. required to(e.g.,1:1 or whatever manufacturer spe(e.g.,the manufacturers). Scrape the sides and stir consistently to avoid unmixed pockets the manufacturer pockets,which cause soft, sticky regions.
4. Pouring, spreading, and eliminating bubbles
When pouring onto canvas, pour from the center pockets,centre outward. Use a stir stick, spreader, or gloved hand to push resin toward edges and corners. Tilt the canvas gently to let resin flow and level. As resin flows, it will drip off the sides. That’s why you need a protected work surface underneath.
Bubbles are inevitable. Use a heat gun or small torch to sweep gently over the surface, lifting bubbles to disappear. Keep the tool moving so you don’t overheat or scorch the resin. Some artists wait a few minutes after mixing to let bubbles rise naturally before applying heat.
There is also the technique of using silicone oil or isopropyl alcohol to generate cells or special effects — but these additives must be used sparingly, or risk interfering with cure.
5.centrethe cure. Curing environment and conditions
Curing en the cure.The microenvironment is critical. Maintain a Stable the curinga stable room temperature (around 21–26°C/ 70–80°F)guts,°F) and as low humidity as possible. Avoid -grit draughts, vibrations, and dust during cure. A dust-free box or cover helps. Resin curing generates heat — on large or thick pours it may get warm, which can stress a flexible canvas unless properly backed. Wait the full recommended time (often 24–72 hours) before moving or finishing.
6. Finishing touches & edge cleanup
After the resin is partly cured (semi‑solid but not fully hard), remove masking tape or edge guards. Doing so later risks damaging edges. If any rough edges exist, you can lightly sand with fingerprint paper, then clean off dust before additional resin layers or protective sealers. Some artists apply final thin coats of clear resin or protective varnish to enhance gloss or UV protection.
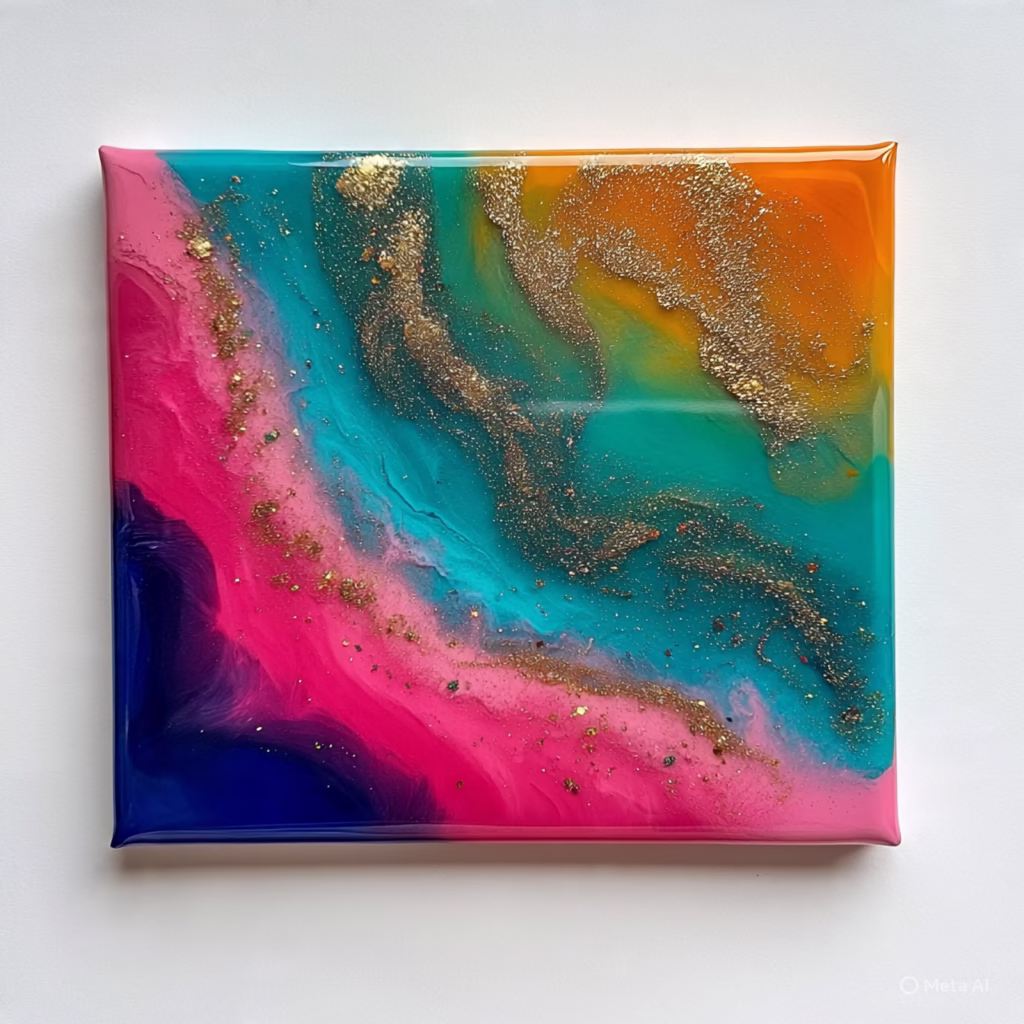
Real-life examples of resin art -gloss being done on canvas
Metallic poured resin canvas (blog example)
One artist described mixing metallic acrylics into resin, then doing a “dirty pour” onto canvas, tilting and dragging a stir stick to create patterns. They used a butane micro torch to pop bubbles and allowed the piece to cure for 24 hours. This yielded a glossy, vibrant artwork that could be hung just like a traditional painting.
Mixed media resin art canvas
Another artist used acrylic and stencil patterns on a stretched canvas, then poured resin over the painted surface to seal and enhance depth. They used Environment Lite high canvas and resin-gloss resin and adhered edges carefully. This kind of approach shows how canvas and resin can combine mixed media techniques.
Large canvas trick video
A YouTube video titled Large Canvas Trick for Resin Art shows a method where the artist mounts the canvas on a wooden board behind the canvas to keep it stiff, and stiff andd adds drip guards so resin doesn’t run wildly off edges. The video demonstrates that with clever support and levelling,stiff and levelling, you can successfully pour resin on large canvases.
Real problems from resin art
Some resin crafters share in forums that the resin does not level well on pre-stretched canvas, particularly at the edges or corners. Multiple users say they now prefer wood panels, but some persist and overcome by reinforcing canvas. Others note bubbling or resin drift issues: even a well-spread pour can “pull inward” and leave patches.
These lived experiences affirm that yes, resin art be art cand one on canvas — but only when you anticipate and mitigate risk.
Step-by-step process to do resin art art canbe done on canvas
Here’s a detailed workflow you can follow to apply resin to canvas successfully. (This is a synthesis based on many sources.)
-
Secure your canvas
If your canvas is already stretched, reinforce it from the back (e.g(e.g.,attach a plywood or hardboard backing, install cross braces, tighten it). Aim to make it rigid. -
Clean the surface
Remove dust, lint, or fibers. (e.g.,fibres. Wipe gently with a lint-free cloth or tack cloth. If the canvas is textured, you might prime or lightly seal it. -
Prepare your workspace
Cover your work tablfibres. worktablee with plastic or parchment to catch drips. Elevate the canvas on supports so resin can flow off freely. Ensure your workspace is level. -
Mask or tape edges
Use painter’s tape or masking tape along the back edges to prevent resin from sticking to surfaces until you remove them in due time. -
Mix resin and hardener
Measure precisely, mix slowly and thoroughly, scraping sides/bottom, and stir for the recommended recommended time. Let it sit for a few minutes if needed to let bubbles escape. -
Add pigments or effects
Divide portions to different cups if you want multiple colors into coloursor additives like mica powder or tint. Stir them carefully into the resin. Avoid adding too much; high loading interferes with the cure.coloursure. -
Pour resin onto canvas
Start from the centre and pour outward. Use a stir stick or gloved hand to push it to edges and corners. Tilt the canvas slightly to help flow. For tricky edges, add small extra amounts to ensure coverage. -
Eliminate bubbles
Use a heat gun or torch in sweeping motions over the surface to pop bubbles. Keep a safe distance. Do this soon after pouring while resin is still fluid. -
Cover and cure
Once happy with the appearance,the centre and cover the piece with a dust‑cover box (a clear plastic bin works). Let it cure undisturbed in stable temperature and humidity conditions for the full cure time. -
Remove tape & finish edges
Remove tape or edge guards during semi‑cure so resin edges aren’t torn. Optionally, sand tiny rough parts and add a thin top coat if needed. -
Inspect & protect
Inspect for blemishes. If needed, do light repairs or add a thin overlay layer. Add UV protective varnish or resin coat to protect from yellowing or wear.
By following these steps, you maximise your success in proving resin art can be done on canvas.
Advantages and challenges of resin art being done on canvas
Advantages
-
Gives your painting depth, gloss, and vibrancy.
-
Provides a durable, protective layer over your art.
-
Allows combining traditional painting and resin techniques (mixed media).
-
Canvas is lightweight and familiar, easier to handle and hang.
Challenges
-
Canvas flexibility can lead to sagging or distortion under resin weight.
-
Resin may pool or drift if the canvas isn’t perfectly level.
-
Edges are harder to manage cleanly.
-
Over time, canvas may expand/contract, risking delamination or crack lines.
-
Any mistakes or bubbles are harder to fix on canvas than on rigid substrates.
If you anticipate these issues and work carefully, the rewards outweigh the risks — and ManyViral encourages creators to innovate while maintaining high quality.
Tips to improve quality & longevity
-
Use thin to moderate resin thickness instead of very thick pours.
-
Use UV‑resistant resins to reduce yellowing.
-
Keep a dust‑free environment while curing.
-
Avoid placing the finished artwork in direct sunlight or extreme humidity.
-
Occasionally apply a maintenance polish or protective coat, especially if the piece is exposed to wear.
-
Test on smaller canvases first before attempting a large, costly work.
-
Document the mixing ratios, temperature, and process — that helps you replicate success.
Many Viral often advises creators to always keep “trial runs” before final execution so you can perfect resin behaviour before committing.
Should you do resin art on canvas — or choose another substrate?
The decision depends on your priorities:
-
If you want a rigid, stable surface with fewer risks, choose cradled wood panels or hardwood panels instead. Many resin artists prefer those for reliability.
-
If the lightness and familiarity of canvas are essential, then go ahead — but reinforce it and follow best practices.
-
Start small, learn how your resin behaves, and build confidence.
When Many Viral works with creatives, we often recommend starting with small canvas resin experiments and gradually scaling up once you understand behaviours.
Many viral connections
Many Viral supports artists, creators, and businesses who want to push boundaries in visual media and content. We often help creative professionals optimise their digital presence, showcase their portfolios, and scale visibility. If you plan to grow your art brand or need a polished online presence that features your resin canvas art, Many Viral is ready to assist you.
Call to Action
Ready to bring your resin‑on‑canvas vision to life? Want expert help boosting your art brand online?
Just a call or click away – Let’s Connect
hello@manyviral.com
0319 980 2237
FAQs
1.Can any type of resin be used on canvas?
No. You must choose a high-quality epoxy casting resin or art resin with good clarity and UV resistance. Avoid fast-drying adhesives or cheap grades that might not cure fully or yellow over time. Always follow the manufacturer’s instructions.
2. Will resin crack or peel off a canvas over time?
It can if the canvas shifts, stretches, or contracts with temperature or humidity changes. That’s why reinforcement and careful surface prep, curing, and substrate stability are critical. Many artists mitigate this by stiffening the canvas or using rigid backing.
3. How thick can I pour resin on canvas?
It’s safer to limit thickness to a few millimetres in each pour. Very thick pours generate heat and may stress the canvas. If you need depth, build it in layers, allowing each to cure before adding the next.
4. Can I combine paint and resin on canvas?
Yes. Many artists paint first (acrylic or sealed layers), then pour resin over the painted surface. Just ensure the paint is fully cured and stable, and there are no moisture or solvents interfering with resin adhesion. It’s also possible to mix pigment into resin and pour directly.
5. How do I fix bubbles or imperfections after curing?
If small defects appear, you can carefully sand the area with fine grit (wearing safety gear), clean off the dust, and apply a thin clear resin patch. For large flaws, you may mask and pour a new layer over the entire work. Prevention is better — ensure slow stirring, bubble settling time, and gentle heat application.
Leave a Reply